We have updated the content of our program. To access the current Software Engineering curriculum visit curriculum.turing.edu.
Whether, Sweater? Project Requirements
Important Note about Getting Started
-
This project is an API based application. Use the
rails new --api and other flags (-T -d=postgresql)when creating your application. Doingrails newwhich includes views, etc is NOT a correct project structure. -
We would like to see a README file included in your project that outlines the learning goals, how someone can clone and set up your application and where they can get their own API keys, and happy path endpoint use.
-
It is optional to use a gem for serializing.
1. Application Landing Page
The front-end team has drawn up this wireframe for the application’s landing page:
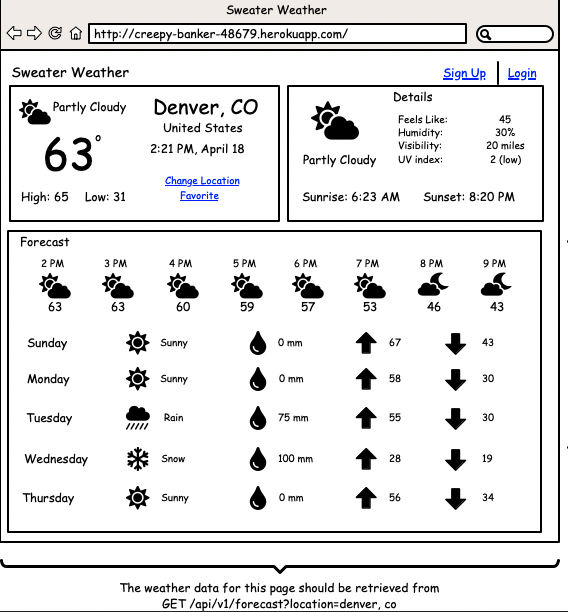
They need your API to expose two API endpoints in order to populate this page with the necessary data.
1. Retrieve weather for a city
Request:
GET /api/v1/forecast?location=cincinnati,oh
Content-Type: application/json
Accept: application/json
Response:
The response data should contain exactly these elements and nothing more:
- a data attribute, under which all other attributes are present:
- id, always set to null
- type, always set to “forecast”
- attributes, an object containing weather information:
- current_weather, holds current weather data:
- last_updated, in a human-readable format such as “2023-04-07 16:30”
- temperature, floating point number indicating the current temperature in Fahrenheit
- feels_like, floating point number indicating a temperature in Fahrenheit
- humidity, numeric (int or float)
- uvi, numeric (int or float)
- visibility, numeric (int or float)
- condition, the text description for the current weather condition
- icon, png string for current weather condition
- daily_weather, array of the next 5 days of daily weather data:
- date, in a human-readable format such as “2023-04-07”
- sunrise, in a human-readable format such as “07:13 AM”
- sunset, in a human-readable format such as “08:07 PM”
- max_temp, floating point number indicating the maximum expected temperature in Fahrenheit
- min_temp, floating point number indicating the minimum expected temperature in Fahrenheit
- condition, the text description for the weather condition
- icon, png string for weather condition
- hourly_weather, array of all 24 hour’s hour data for the current day:
- time, in a human-readable format such as “22:00”
- temperature, floating point number indicating the temperature in Fahrenheit for that hour
- conditions, the text description for the weather condition at that hour
- icon, string, png string for weather condition at that hour
- current_weather, holds current weather data:
Example:
{
  "data": {
    "id": null,
    "type": "forecast",
    "attributes": {
      "current_weather": {
        "last_updated": "2023-04-07 16:30",
        "temperature": 55.0,
        etc
      },
      "daily_weather": [
        {
          "date": "2023-04-07",
          "sunrise": "07:13 AM",
          etc
        },
        {...} etc
      ],
      "hourly_weather": [
        {
          "time": "14:00",
          "temperature": 54.5,
          etc
        },
        {...} etc
      ]
    }
  }
}
Requirements:
- Endpoint needs to use the city and state from the GET request’s query parameter and send it to MapQuest’s Geocoding API to retrieve the latitude and longitude for the city. Use of the MapQuest’s Geocoding API is a hard requirement.
- Retrieve forecast data from the Weather API using the latitude and longitude from MapQuest.
- Testing should look for more than just the presence of attribute fields in the response. Testing should also determine which fields should NOT be present. (don’t send unnecessary data)
2. User Registration
The front-end team has drawn up this wireframe for registration:

Your api should expose this endpoint:
Request:
POST /api/v1/users
Content-Type: application/json
Accept: application/json

{
  "email": "whatever@example.com",
  "password": "password",
  "password_confirmation": "password"
}
Response:
status: 201
body:

{
  "data": {
    "type": "user",
    "id": "1",
    "attributes": {
      "email": "whatever@example.com",
      "api_key": "t1h2i3s4_i5s6_l7e8g9i10t11"
    }
  }
}
Requirements:
- This POST endpoint should NOT call your endpoint like
/api/v1/users?email=person@woohoo.com&password=abc123&password_confirmation=abc123, and should NOT send as form data either. You must send a JSON payload in the body of the request- in Postman, under the address bar, click on “Body”, select “raw”, which will show a dropdown that probably says “Text” in it, choose “JSON” from the list
- this is a hard requirement to pass this endpoint!
- A successful request creates a user in your database, and generates a unique api key associated with that user, with a 201 status code. The response should NOT include the password in any form
- An unsuccessful request returns an appropriate 400-level status code and body with a description of why the request wasn’t successful.
- Potential reasons a request would fail: passwords don’t match, email has already been taken, missing a field, etc.
3. Login
The front-end team has drawn up this wireframe for log in:
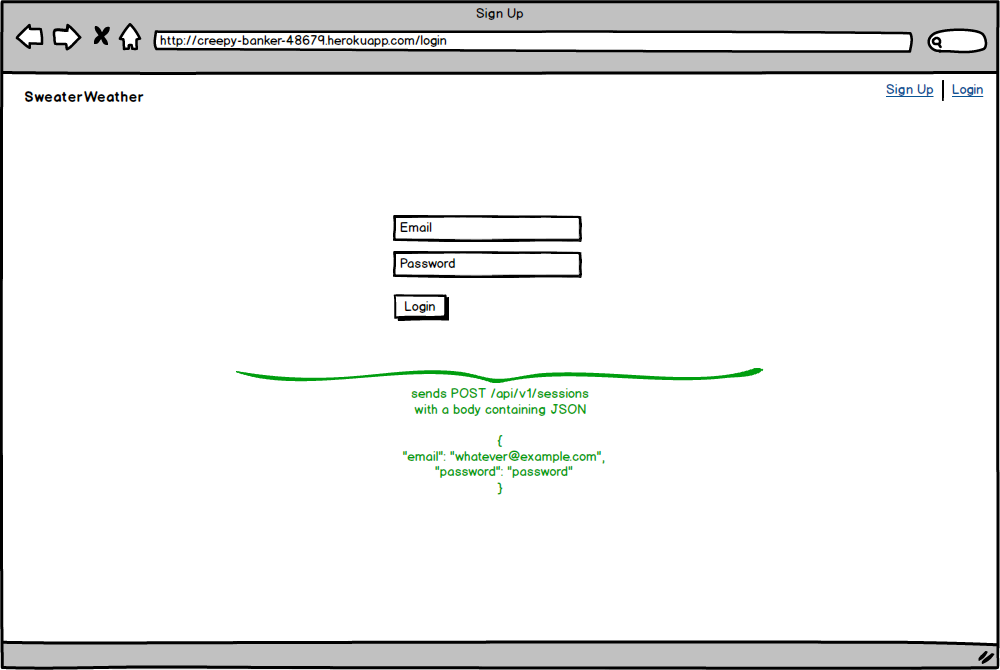
Your api should expose this endpoint:
Request:
POST /api/v1/sessions
Content-Type: application/json
Accept: application/json

{
  "email": "whatever@example.com",
  "password": "password"
}
Response:
status: 200
body:

{
  "data": {
    "type": "user",
    "id": "1",
    "attributes": {
      "email": "whatever@example.com",
      "api_key": "t1h2i3s4_i5s6_l7e8g9i10t11"
    }
  }
}
Requirements:
- This POST endpoint should NOT call your endpoint like
/api/v1/sessions?email=person@woohoo.com&password=abc123, and should NOT send as form data either. You must send a JSON payload in the body of the request- in Postman, under the address bar, click on “Body”, select “raw”, which will show a dropdown that probably says “Text” in it, choose “JSON” from the list
- this is a hard requirement to pass this endpoint!
- A successful request returns the user’s api key.
- An unsuccessful request returns an appropriate 400-level status code and body with a description of why the request wasn’t successful.
- Potential reasons a request would fail: credentials are bad, etc
- Security tip: never tell a user which field (email/password) is incorrect, as this alerts malicious users how to attack your site (eg, if they’ve guessed a correct email address, and you tell them the password is bad, then they don’t need to keep guessing email addresses, and can just try to crack the password)
4. Road Trip
The front-end team has drawn up these wireframes for a feature where users can plan road trips:
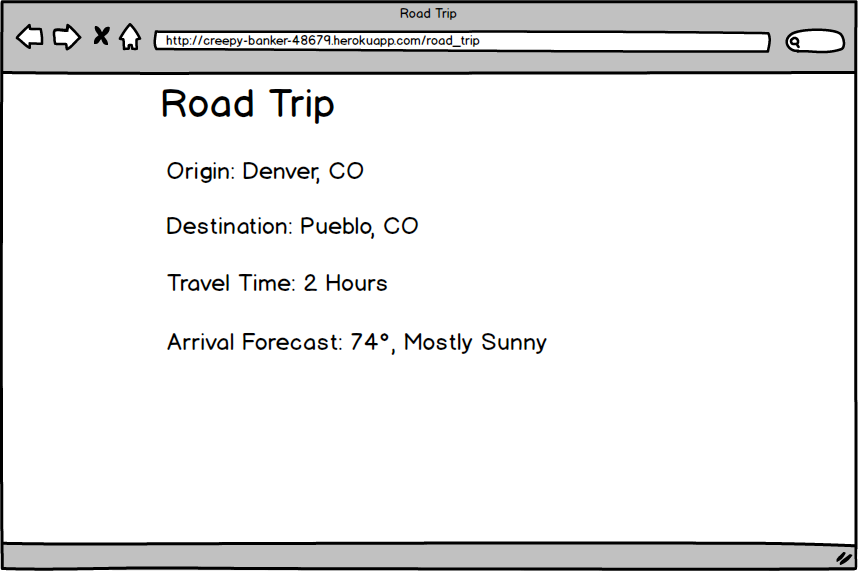
Request:
POST /api/v1/road_trip
Content-Type: application/json
Accept: application/json

body:

{
  "origin": "Cincinnati,OH",
  "destination": "Chicago,IL",
  "api_key": "t1h2i3s4_i5s6_l7e8g9i10t11"
}
Response:
Your response should have the following information for the front-end:
- a data attribute, under which all other attributes are present:
- id, always set to null
- type, always set to “roadtrip”
- attributes, an object containing road trip information:
- start_city, string, such as “Cincinatti, OH”
- end_city, string, such as “Chicaco, IL”
- travel_time, string, something user-friendly like “2 hours, 13 minutes” or “2h13m” or “02:13:00” or something of that nature (you don’t have to include seconds); set this string to “impossible route” if there is no route between your cities
- weather_at_eta, conditions at end_city when you arrive (not CURRENT weather), object containing:
- datetime, date and time for the reported weather at the destination at the approximate hour of arrival
- temperature, numeric value in Fahrenheit
- condition, the text description for the weather condition at that hour
- note: this object will be blank if the travel time is impossible
eg:
{
    "data": {
        "id": "null",
        "type": "road_trip",
        "attributes": {
            "start_city": "Cincinnati, OH",
            "end_city": "Chicago, IL",
            "travel_time": "04:40:45",
            "weather_at_eta": {
                "datetime": "2023-04-07 23:00",
                "temperature": 44.2,
                "condition": "Cloudy with a chance of meatballs"
            }
        }
    }
}
Requirements:
- This POST endpoint should NOT call your endpoint like
/api/v1/road_trip?origin=Cincinatti,OH&destination=Chicago,IL&api_key=t1h2i3s4_i5s6_l7e8g9i10t11, and should NOT send as form data either. You must send a JSON payload in the body of the request- in Postman, under the address bar, click on “Body”, select “raw”, which will show a dropdown that probably says “Text” in it, choose “JSON” from the list
- this is a hard requirement to pass this endpoint!
- API key must be sent
- If no API key is given, or an incorrect key is provided, return 401 (Unauthorized)
- You will use MapQuest’s Directions API:
https://developer.mapquest.com/documentation/directions-api/ - The structure of the response should be JSON API 1.0 Compliant.
- Your code should allow for the following: (NOTE: These scenarios are expected in your POSTMAN Demo)
- Traveling from New York, NY to Chicago, IL, with appropriate weather in Chicago when you arrive __11 hours later__
- Traveling from New York, NY to Los Angeles, CA, with appropriate weather in L.A. when you arrive __40 hours later__
- Traveling from New York, NY to Panama City, Panama, with appropriate weather in Panama when you arrive __3 days later__
- Traveling from New York, NY to London, UK, weather block should be empty and travel time should be “impossible”
Extensions
-
Add a query parameter to applicable endpoints called “units”, and allow the user to pass “metric” or “imperial” as a value (ie, units=metric or units=imperial) and return temperatures in Celcius for metric, and Fahrenheit for imperial.
-
Cache the city/state and lat/lng data within Rails for a period of time. Also consider storing it in your database.
- Check the Mod 3 Extensions page for additional things you can add to your project.
- Add an endpoint that will retrieve a background image for a given city that the frontend team can use on the landing page. Requirements below:
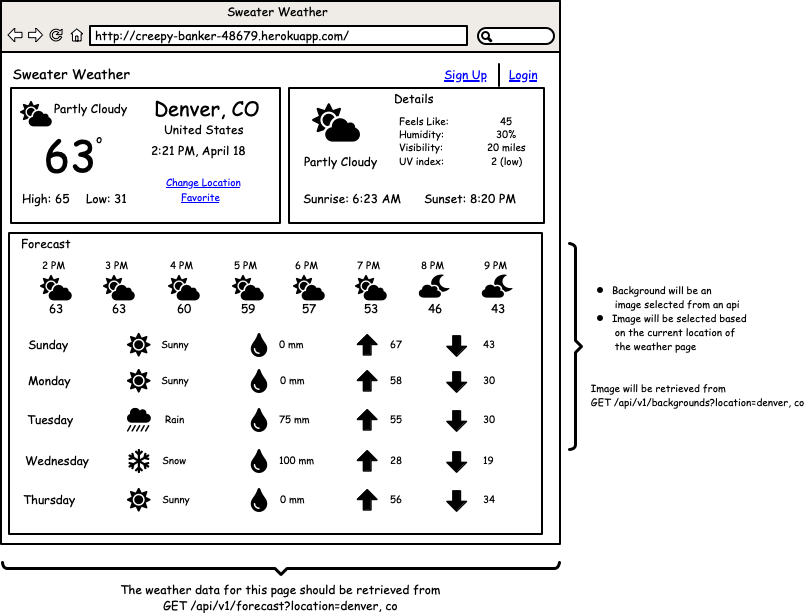 Request:
GET /api/v1/backgrounds?location=denver,co
Content-Type: application/json
Accept: application/json
Response:
- This will return the url of an appropriate background image for a location.
- An example of a response COULD look something like this:
status: 200
body:
{
  "data": {
    "type": "image",
    "id": null,
    "attributes": {
      "image": {
        "location": "denver,co",
        "image_url": "https://pixabay.com/get/54e6d4444f50a814f1dc8460962930761c38d6ed534c704c7c2878dd954dc451_640.jpg",
        "credit": {
          "source": "pixabay.com",
          "author": "quinntheislander",
          "logo": "https://pixabay.com/static/img/logo_square.png"
        }
      }
    }
  }
}
Requirements:
- Implement a new API service (Unsplash, Pexels, Microsoft Bing Image search, Wikimedia image search, Flickr and more) to use the name of the city to get the URL of an appropriate background image. (we don’t recommend pixabay, it has a very limited image search, it’s only for an example above!)
- Please read the terms of use of your image provider about giving credit for the search results, and put appropriate content in the response!!
Additional Challenge:
- Determine the time of day and current weather and include that in your search; for example, searching for “denver evening snow” might return a far more interesting result