We have updated the content of our program. To access the current Software Engineering curriculum visit curriculum.turing.edu.
Express & Sequelize
Learning Goals
- Understand when and why to use Express.js in the backend of an application
- Discuss how to create database migrations, seed files & create/retrieve data using Sequelize
What is Node?
Node is an open-source, cross platform, runtime environment that allows developers to create all kinds of server side tools and applications in JavaScript. It is intended for use outside of a browser context so the environment omits browser-specific JavaScript APIs and adds support for more traditional Operating System APIs including HTTP and file system libraries.
What is Express?
Express is a lightweight, un-opinionated web framework built on top of the server functionality provided by node.js. It helps to simplify and organize the server-side functionality of your application by providing abstractions over the more confusing parts of node.js, and adding helpful utilities and features. It provides mechanisms to:
- Write handlers for requests with different HTTP verbs at different URL paths (routes).
- Integrate with “view” rendering engines in order to generate responses by inserting data into templates.
- Set common web application settings like the port to use for connecting, and the location of templates that are used for rendering the response.
- Add additional request processing “middleware” at any point within the request handling pipeline.
Why do we use Express?
Think about how and why we use jQuery on the front-end. Vanilla JavaScript can be verbose and difficult to read. jQuery came along to give developers a nicer-looking syntax to perform the same operations. It was a library built to abstract the trickier parts of JavaScript and make them easier to write and work with. Express was built for very similar reasons.
Just like browser-based JavaScript, the syntax for using plain node.js isn’t the friendliest. Node gives you enough low-level features to build the backend of an application, but Express is a light layer built on top of Node to make these low-level features a little easier to read and write.
Advantages of Express
While node.js provides us with all of the functionality we need for our backends, writing this logic without Express is more difficult to make sense of and maintain. The two biggest advantages of Express are:
- the collection of helpful utilities and conveniences that abstract away the node.js complexity. (e.g. sending a single image file in raw node.js is quite complex, but can be done in just one line with express)
- the ability to refactor request handlers into smaller pieces that are more modular and maintainable. (node.js, by default, requires you to create one large request handler, which makes your logic more rigid and difficult to refactor)
Request Flow
When we are just using node.js, the flow of a single request might look like this:

When we add Express, there a couple of additional steps added to the flow of a request:
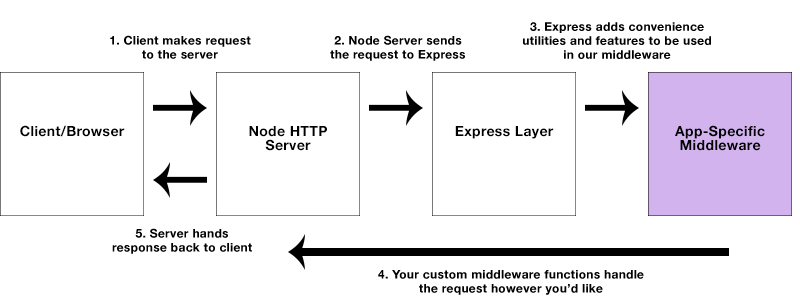
While the Express flow might look more complex, it actually makes the developer’s job a lot easier. In this flow, the developer is only responsible for the ‘Middleware’ part of the process. This replaces the single request handler function that you would write without Express. Writing middleware for Express is a lot easier to write and more maintainable because of the ‘Express’ step that abstracts the complex logic for us.
Routing & Middleware
Earlier we mentioned that with plain Node.js, you would create a single function to handle requests. This single function can get large and unwieldy as your application grows in complexity. Express provides routing methods(.get, .post, etc.) that allow you to break this single function into many smaller functions that only handle one thing at a time.
Express is a routing and middleware web framework that has minimal functionality of its own: An Express application is essentially a series of middleware function calls. Our code will be concerned with responding to client requests to different URLs with different methods (GET, POST, etc).
Let’s pick apart the structure of how we define an Express route:
app.get('/', function(request, response) {
  response.send('Hello World!')
})
In the above example, our express app (denoted by app), is handling a GET request to '/'. The second parameter in this call is our callback that defines how we’re actually going to handle what happens when a user makes a GET request to '/'. The callback takes two parameters: the request (request) and the response (response). In this example, our hander is simply sending back a response (response.send) with the text ‘Hello World!’.
This pattern is exactly how we can define and handle any routes in an Express application. There are four main pieces to this code:
app- the instance of our Express application- a METHOD - the method specified when the request is made from the client. (e.g.
GET,POST,PUT,DELETE) - a PATH - the endpoint that we are requesting
- a HANDLER - the function we write that contains the logic for how the request should be dealt with, and what kind of response it should return
Exploring our Express App
Let’s open up your arcade app that you created in your pre-work.
With a partner take about 10 minutes and walk through the following files and discuss what each line of code is doing:
- app.js
- routes/api/v1/games.js
Sequelize and Adding a One to Many Relationship
Sequelize is a promise based Object Relational Mapper (ORM). It allows us to simply interact with relational databases by abstracting away the need to use SQL directly. In the pre-work, we used Sequelize to create our database, generate a single model, run migrations, and to seed our development database. Now, we are going to look at how to set up a one-to-many relationship.
Let’s create a store model first.
npx sequelize model:generate --name Store --attributes name:string,phoneNumber:bigint
Next, let’s think about the type of relationship we want to have between games and stores. A store should have many games and a game belongs to a store. This means we need to update our games table to have a foreign key of store id. To do this we will need to generate a migration to add the store id to games.
npx sequelize migration:generate --name addStoreIdToGame
Open up this migration and input the following:
'use strict';

module.exports = {
  up: (queryInterface, Sequelize) => {
       return queryInterface.addColumn(
         'Games',//table we are adding the column too
         'StoreId', //the foreign key that we are adding
         {
          type: Sequelize.INTEGER,
          references: {
            model: 'Stores', // name of Target model
            key: 'id', // key in Target model that we're referencing
          },
          onUpdate: 'CASCADE',
          onDelete: 'SET NULL',
        }
       )
  },

  down: (queryInterface, Sequelize) => {
    return queryInterface.removeColumn(
      "Games", // name of Source model
      "StoreId" // key we want to remove
    );
  }
};
Important: The foreign key StoreId must be written in Pascal Case(both the s and i are capitalized).
Looking at onUpdate we see the value is set to CASCADE. What does this mean? This means that if we update the id of a store on the stores table it will also update foreign key of store id on the games table.
Similarly, with onDelete the value is set to SET NUll. If we delete a store, we do not want to delete the games that are associated to it, but instead set the foreign key value to NULL.
We’ve set up our one-to-many relationship at the database level, but now we must update our game and store models to reflect these relationships too. Fortunately, that is very simple to do. Let’s start with the game model. Open up game.js. You should see:
Game.associate = function(models) {
   // associations can be defined here
};
Replace the associations can be defined here comment with Game.belongsTo(models.Store). So, now you should see:
Game.associate = function(models) {
  Game.belongsTo(models.Store, {foreignKey: 'StoreId', as: 'store'})
};
Next add the has many to the store model. Open up store.js and update it the associate section.
Store.associate = function(models) {
  Store.hasMany(models.Game, {as: 'games'})
};
Great job! Now our associations are complete at the database and model level.
Since we have a seed file for our games, we will need to make adjustments to include stores and the association to stores.
Run npx sequelize db:seed:undo
Now you can delete the current seed file, and generate a new one to include our our recent changes. Try it: Write a seed file to generate stores and games.
Additional CRUD Practice
On your own: Write the CRUD routes for store.